All,
It is very easy and sometimes warranted to throw mud at a manufacturer, supplier or hobby shop when things go wrong. From time to time you also wonder the attitudes of some of these establishments when you dare to seek advice on the status of an order. In my case, being solely reliant on mail order, if an order is horribly overdue when no other advice has been given I make a call just in case the postal system has dropped the ball and the longer I leave it can have an adverse effect on any meaningful search for the errant package which in turn can mean someone will be out of pocket. On some occasions these calls are met with a pre-conceived attitude that I am merely whinging about the non delivery of an order and am just being rudely impatient.
Well...there is always the converse situation and the service goes "above and beyond" and to balance things up I will post the experience here.
I must firstly advise that I have no vested interest in this establishment, the owners or staff...
I went to the Hobbyland ( Hornsby NSW ) website late last week and while perusing the site a particular rollingstock kit took my eye and I decided to take advantage of the online purchasing system to place the order. On Sunday I had a call from the store to explain that the kits I had ordered were sold ( over the counter ) the morning after I had placed the order and at that moment they were out of stock. Genuine apologies for the oversight were offered and I was given the option to either await a backorder or a refund was also offered. I elected to put these kits on backorder and enquired regarding the expected delivery date. This morning I had another call from Hobbyland advising that the kits were now in stock and were leaving today and a follow up call is to be expected just to ensure all is well and the order has arrived etc etc.
Yes, they made the error but had no hesitation in being proactive by advising me of this fact by ringing me on a SUNDAY!!!...They could have remained faceless by utilising an email... The promises they offered have been honoured and the order is on the way...and I have been kept in the loop throughout.
This style of retail customer service is largely and sadly a thing of the past and my experience with this retailer over the last few days has yielded many lessons and indeed some have not been lost on me as a business owner...
Well Done Hobbyland!!!
Wednesday 26 June 2013
Monday 24 June 2013
Things Keep Bubbling Along
All,
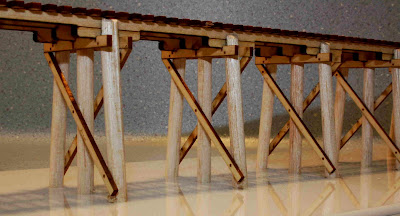
Have made some progress on the "Timber Opening" or trestle project. It is convenient that the railways loved utilising 12" x 12" girder components for a host of structures as it makes my life easier. This example is of the 14' variety which equates to 14' centre to centre of the bents. The transoms have been given bolt detail which follows prototype practice in being staggered from one transom to the next. All other detail has been included and the only divergence from prototype being the capwales and angle bracings not checked into the piles and while this feature would be nice to achieve...it is very time consuming and to my eyes the present method does not detract too much from the overall scheme.
The base utilised for construction is 3mm acrylic with the pile holes laser cut as a jig arrangement. The difficult part about this project is the age old question...How Long and How High???. To ever be considered as a kit it would need to be decided as each modeller has their own requirements. In the next few weeks we will ( with help from other modellers I hope ) decide which variety to look at first and try and work out a construction method which utilises a span by span ability...easily said!!!
Well if nothing else it has been an enjoyable time spent researching, measuring, developing and building this example. There are wing assemblies completed for this version and I will post some completed shots. We have now also built a jig which when loaded with timber, machines the rebate in the outer piles where they meet the girders and irrespective of what height the bents are made this will make this operation a hell of a lot easier. Now to find a spot on the layout!!!


 |
| The jig for rebating the piles....12 at a time is certainly better than hand filing on at a time!!! |
Sunday 16 June 2013
Another Day, Another Adventure...
All,
Decided to go "over the hill" to Gunning this morning to catch up with some friends for a spot of breakfast. For those unfamiliar with the area, the old highway is still available as a brilliant alternative to the new highway and Gunning bypass. The old road can be accessed near Breadalbane if heading south from Goulburn and runs at arm's length (and sometimes closer) to the Main Southern Line through such exotic locations as the aforementioned Breadalbane, Mutmutbilly, Cullerin, Fish River and of course Gunning before rejoining the main highway to the south. There are plenty of photographic locations along this stretch of road and for the history fan there are plenty of opportunities to marvel at the original railway alignment that can still be readily seen at many locations which provides a window to the past before the main southern line was duplicated through this area around 100 years ago. I must confess that if I had a week to spare it would be a timely and enjoyable experience to photographically document these deviations and compile them for an article in one of the relevant publications.
So what has all of this got to do with this post.... Well, there are not many timber overbridges left on the main south and there is one located a couple of kilometres north of Fish River. This angle approach double track span example has been on my "must investigate" list for a few years now and today was the day!. A few years ago this bridge was in a sorry state and when I one day witnessed a group of workers and the dreaded orange barrier tape near the bridge I thought I had blown my chances of recording it's existence and was somewhat surprised when later informed they were here to repair and not "nuke" the thing. To make matters even better this repair was to be carried out utilising like for like materials and not a slab of pre-stressed concrete in sight.
The trek to the bridge was taken by foot as the access road was quite wet and boggy in places and a walk was not going to kill me. With the winter now upon us and the temperature in single digits, I still encountered a shingle back lizard sunning himself and a regulation size brown snake sunning himself next to the bridge....we had a short discussion and came to the agreement no further action would be taken if we both minded our own business...He dozed, while I took photos... a fair enough outcome I thought. While on the subject of animals....why is it that cows have a modicum of intelligence and sheep are completely devoid of any mental ability???....
This particular bridge would have originally come into being when the line was duplicated and realigned to the east by about 200 metres which would have meant a resumption of the landholders pasture which in turn would have ( without the bridge ) rendered the land on the other side of the mainlines inaccessible. The bridge while certainly able to withstand vehicular crossings, would have provided safe and easy stock transfer rather than traversing the mainlines via a level crossing. The shots below also serve as another example of a timber bridge with square piles...but the design is certainly different to a main road type overbridge. The renovation has been done in a historically sympathetic way with only the mini-orb corrugated sheeting being an obvious sign of the present.
This example of a timber overbridge certainly gives me another example to design around...All in all a good day!!!
As a modelling footnote, I may just look at incorporating some "deviations" to my layout if given the right circumstances as they certainly would add some interesting scenes and points for discussion.


Saturday 15 June 2013
The Charm Of The Camden Line...Continued
All,
Have made some progress on the wayside station of Grahams Hill or ( Graham's Hill ). The correct grammar of the location depends upon which piece of research material you are reading at the time. The one photo I have appears not to show the apostrophe in the name...but several government maps and other material do show it. My apologies if I have erred.
I am quite happy with the way the model is shaping up and as the accompanying shots show there is not a lot left to do before the surrounding landscaping,scenery and of course the reason for being...the track, are fitted. The roof still needs sheeting, corners of the shed will have capping pieces fitted, handrails will be painted white, final weathering can then take place and I will need to research a little more and hopefully uncover whether or not seating inside the waiting shed was afforded for intrepid passengers.
Even though this particular station did not sport a sign of the magnitude shown in the photographs...I took the opportunity to trial a method of manufacturing station signage and while the early results are promising I will keep trying to track down the correct railway font. I am unsure whether the font was a foundry font specifically designed for the NSWGR or was a derivation of a proprietary font. Time will tell and it may be that I will need to reconstruct the alphabet as per the original font and keep on file for future use. For those interested...the sign is lasered giving some 3D relief...but an alternative material will be trialled to give a deeper effect and at that time screw heads will be added to the appropriate spots on the letters to add a bit more realism.
I was asked today whether this item will ever see the light of day as a kit. It is certainly a relatively easy construct and the components certainly could be redesigned to streamline the construction plus I would feel sure that the Camden Line was not the only location that ever sported this type of platform construction...so I guess if the demand was there it could be slated in to the ever growing program.
I will post on progress sometime in the future when the scene is complete and I am certainly looking forward to attempting the other wayside stations on this extremely interesting line.
 |
| The sign has yet to find a final location....if at all. |

 |
Friday 14 June 2013
The Charm Of The Camden Line...Another Challenge.
All,
Around 5 or 6 years ago while researching Cream Sheds, I came across an example of the shed located at Narellan and during this time developed a fascination for the Campbelltown to Camden Railway. In more recent times again due to research my fondness of this quaint little branchline of yesteryear has been rekindled. Whichever way one looks at it...it is a ripe prototype subject for modelling purposes and for me has just about every aspect that I find enjoyable about the hobby. Firstly is the plethora of differing styles of architecture and variety in the infrastructure which first draws the eye. The grades, curves and limited length of trains lends itself to a prospective layout builder who has limited space and the ability to selectively compress the distances between stations. Operationally the branch has a lot to offer as well. It would also be a winner for the modeller with limited funds as there were really only two regular classes of steam locos that traversed the line and probably another four or so classes of diesel power that graced the branchline, with the only drawback about the required locomotives being that none of them are commercially available RTR...but there is a glimmer of hope with the 20 class being mooted by Austrains that soon may be available. Rollingstock would also be a rather comparatively cheap option given the limited variety of traffic sources on the line. For me, this paragraph does little, as my decision has been made and the bulk of the track for my layout has been already laid...but in another life this branch would figure high on my list for a myriad of reasons.
So what has this branchline have to do with this post???. Well as much as the main stations on this line have familiar styles of station buildings, it is the wayside stations and the sheer variety that have over the years, caught my eye and in particular the style of platform construction. I would feel sure that there are similar examples of this style on other branchlines...but for me it was time to attempt to recreate at least one in model form. I have a plan to model four locations but have decided to commence with Graham's Hill which was first station on the down after leaving Narellan for Camden.
The construction of the platform is essentially a "pig sty" of recycled sleepers for the main structure with a recycled sleeper decking. Both ends sport a traditional ramp to ground level. Of interest is the platform height on all the Camden "wayside" examples, which appear to be at a lower level than normal platform height and this possibly has more to do with these location being of a lowly stature in the scheme of things rather than anything else. Graham's Hill had a small waiting room with a skillion roof which I have decided to mount on a sleeper stack base only because of the lack of any evidence (that I have) to the contrary. Indeed I have no actual dimensions for this location at all and all dimensions modelled have been visually scaled off photographs.
So...while the Cream Shed project referred to in earlier posts has had the landscaping done and is in the process of drying ( a lengthy process in Southern Tableland Winters )...I have made a start on the Graham's Hill wayside station and hopefully I will get a chance over the weekend to complete the main structure and it will then join the queue of cameos awaiting landscaping....As per usual I will post progress as it occurs.
There are many journals and books with reference to this line...but for those interested... in Byways Of Steam 21 there is a story of the Camden Line and within is a page devoted to photos of the wayside stations...
 |
| The Basic Platform Assembly |
 |
| With Decking Now Added |
 |
| Waiting Room Frame and Cladding Awaiting Fitment |
 |
| Waiting Room Base Added...Waiting Room Shed and Handrails Will Complete The Scene... |
Monday 10 June 2013
Cream Shed Part 2...And Another Bout Of The Yips.
All,
While I did manage to "fly under the domestic radar" for most of the weekend...Some self imposed changes to my little project did hold up proceedings a little. I have this little affliction when modelling a specific project and while I have normally over researched the intended subject well beforehand and have it all planned in my head...I tend to get the yips when sitting at the work bench, itching to begin, which sees me scurry off to do some more research before the glue is opened and the paint jars are unsealed. I guess you can never do enough research....but this last minute procrastination can be very frustrating...
While on the subject of research...there is one interesting point about Cream Sheds that does deserve a mention. The vast majority of skillion roofed railway structures are designed and sited so that the roof slopes towards the track and the humble little Cream Shed does the exact opposite. I have no idea as to the reason for this intriguing anomaly....but even some of the departmental "General Arrangement" drawings and the invaluable Greg Edwards drawings of the Type E sheds, show the slope towards the track just like the rest of the platform structures. I have spent countless hours perusing all research material and photos and I cannot find one example that follows the government guidelines. All photos I have show the roof sloping away from the track. If any one can point me to an opposite example, I would be appreciative. One word of caution ( hard learned advice ) is to never blindly utilise the "General Arrangement" drawings as the only source of information when researching an item....I have found too many times that the "As Built" structures can vary modestly or hugely from these drawings...The reason for these deviations are many and varied and deserves a post all of it's own...but not for now...
In my last post I outlined the method in which the shed would be sited and while this was prototypically correct for at least two locations, it quickly became apparent ( to me anyway ) that this fitment was not in the best interests of the overall appearance of the finished scene and a decision was made to modify the plan to a more traditional approach. The attached photos will show what has been achieved as against the description of the planned project in the last post...The scene is far from complete but has been very enjoyable so far. The completed platform facing will not be wasted and will form the basis of another scene later on.


Saturday 8 June 2013
A Long Weekend Task
All,
One certain piece of infrastructure that will find a spot on the layout will be a Cream Shed. Regular readers of this blog will be aware that I have a soft spot for these often overlooked little lineside gems and with the long weekend upon us the time was right to build a cameo scene type mini module that may one day grace the layout.
From my research it would appear that most cream sheds were either a free standing unit with a trackside platform ramped at one or both ends and the whole structure was raised to track level with traditional piers etc....or were positioned on a station platform with the rear of the shed cantilevered on timber or brick piers. In this case I have decided to utilise a design that I have only ever seen used in one prototype location and this incorporates an earthen type loading bank configuration with timber facing and the shed fitted as per a station platform type arrangement.
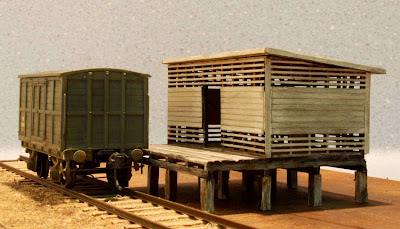
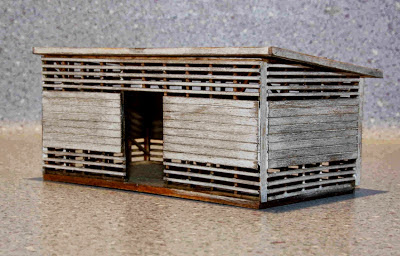
As it happens we have the facing kit...so the opportunity was taken during the week to at least make a start on the major components and give myself a head start for the weekend. It would appear that the majority of cream sheds were painted white ( white washed ) when new and as the layout period will span the transition years, I figured that most sheds that still existed at this time would be lacking in maintenance as they fell out of favour as a useable commodity. In keeping with this logic I have attempted to model a shed that still shows a hint of the paint scheme of the past but in serious need of some TLC which as history has shown was never bestowed on them and in most cases they were unceremoniously demolished as the newer regime of milk product handling took over.
Anyway I have included a couple of shots of progress thus far and I look forward to the weekend as I attempt to bring the scene to life, as best I can. The shed itself will have the underfloor detail and weathering added as the scene takes shape and the facing has been partially pre-weathered and awaits burial into the scene.
Hopefully ( if I can stay under the domestic radar ) I will post some more progress over the weekend.


One certain piece of infrastructure that will find a spot on the layout will be a Cream Shed. Regular readers of this blog will be aware that I have a soft spot for these often overlooked little lineside gems and with the long weekend upon us the time was right to build a cameo scene type mini module that may one day grace the layout.
From my research it would appear that most cream sheds were either a free standing unit with a trackside platform ramped at one or both ends and the whole structure was raised to track level with traditional piers etc....or were positioned on a station platform with the rear of the shed cantilevered on timber or brick piers. In this case I have decided to utilise a design that I have only ever seen used in one prototype location and this incorporates an earthen type loading bank configuration with timber facing and the shed fitted as per a station platform type arrangement.
As it happens we have the facing kit...so the opportunity was taken during the week to at least make a start on the major components and give myself a head start for the weekend. It would appear that the majority of cream sheds were painted white ( white washed ) when new and as the layout period will span the transition years, I figured that most sheds that still existed at this time would be lacking in maintenance as they fell out of favour as a useable commodity. In keeping with this logic I have attempted to model a shed that still shows a hint of the paint scheme of the past but in serious need of some TLC which as history has shown was never bestowed on them and in most cases they were unceremoniously demolished as the newer regime of milk product handling took over.
Anyway I have included a couple of shots of progress thus far and I look forward to the weekend as I attempt to bring the scene to life, as best I can. The shed itself will have the underfloor detail and weathering added as the scene takes shape and the facing has been partially pre-weathered and awaits burial into the scene.
Hopefully ( if I can stay under the domestic radar ) I will post some more progress over the weekend.


Subscribe to:
Posts (Atom)