Sunday 26 May 2013

More Musings and Paintless Weathering

All,

The trouble with posting frequently is that when you don't post for a week or so the rumours start to grow and the questions start to flow.  So... no i have not moved into the retirement village behind where I live and the "hospice" rumour is starting to wear thin....But i do get a laugh so all is good.

Our hobby appears to be going through some changes and also a major shift away from the basics of what used to be the cornerstone of layout building and that is "Scratch Building".  It is now about 40 odd years ago that i first got started in this great hobby and the desire to have something more than a Triang or Hornby piece of rollingstock or lineside item back then, meant a certain commitment to stretch one's faith in yourself to have a go at buiding your own.  The desire to recreate the local and familiar Aussie prototype in model form meant purchasing available scratch building materials, some rudimentary tools ( sometimes to include raiding Dad's highly treasured tools ) and go about creating the landscape for your trains to run through, the lineside detail items and of course the locos and rollingstock as well. 

Of course at that time the first or second generation of locally produced rollingstock kits were hitting the market and while they were extremely crude by today's standards, they were certainly well recieved and were a leg up to speeding the layout creation along.  Even though they were "kits" in the strict sense of the word...even these mouth watering offerings created by local visionaries still required a good level of dexterity and skill to end up with a reasonable facsimile of the intended wagon or loco.

Roll the clock forward 40 years and we are now absolutely spoilt ( although our credit card account would think differently ) by the ever increasing quality of ready to run locos, rollingstock and ready to place lineside items...most approaching museum quality.  So....what is wrong with that? ...every facet of our lives is going through the same types of changes that are invented and marketted to enhance our quality of life.  I cannot argue with these facts and of course have heavily invested in a fair quantity of the recent offerings....But i can't help but wonder the slow demise of what used to be the "trainer wheels" of the hobby and that is "Scratch Building"

I personally offer that the hobby may experience a renaissance where because of the high level of quality RTR locos, rollingstock and ready made structures, people may well find that they have more time to focus on the landscape in which their museum pieces travel or like me strive to create a higher level of  realism in these areas where possible.  For me this is through weathering of rollingstock and always trying to raise the bar and attempting to achieve a better level of lineside structure quality and realism.

While i am penning this post, the fact not lost on me ( and many blog followers would be aware ) is that I am fortunate to have the machinery at my disposal that does take a lot of the menial and repetitious tasks away and does make my chosen tasks a lot easier.  In the end though...if one is to create anything we still need to be able to imagine, visualise and research the intended creation....Something that scratch building ( luckily ) instilled on me many years ago...

With the "Musings" part of the post out of the way it is time to move onto something that some blog followers may find interesting...

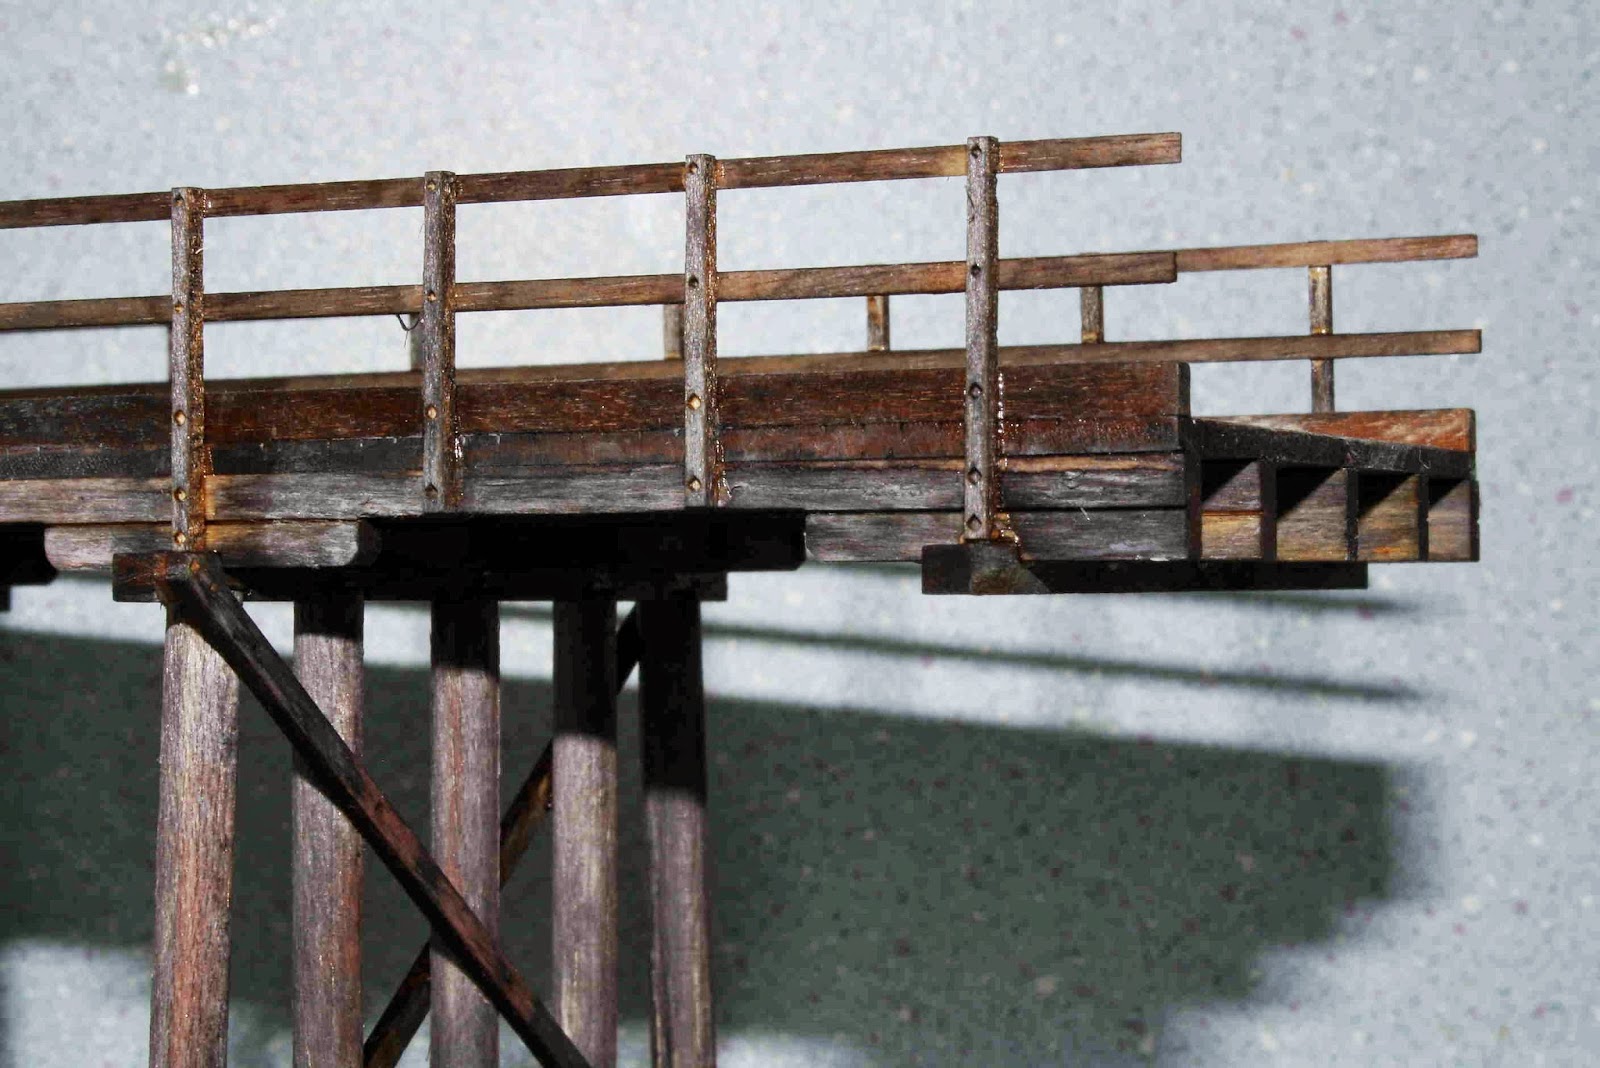
As alluded to in an earlier post...I have been experimenting more and more with the available options for weathering timber structures.  Part of this is the ability to weather and age the timber without the need for paint.  While i have nothing against paint personally... I just think that there are more suitable mediums to achieve the outcome I am after and that is to compliment the raw material and not mask it.  With the added attraction being the fact that there is nothing i like more than varying my approaches to the hobby.  While the following photos are of a well worn ( on this blog anyway ) subject...I think the latest incarnation certainly shows subtle differences in the approach and result of trying these different mediums.  I have still utilised my well worn approach of giving the timber a first coat of the Raven Oil mix...but have then used my "new friends"....the pastels.  I think i am nearly there with this approach and am gaining more and more confidence as each new structure rolls off the assembly line.

While talking about the bridges and seemingly flying in the face of my earlier musings portion of the post...we are, because of demand,  taking orders for those in the hobby who would like a single or double track span bridge built, weathered and ready to "plonk"....If this interests you...just drop us a line and we will discuss your requirements.

In a future post I will also touch on the use of round piles for the bridges and what this means for our upcoming trestle and timber opening range....


Friday 10 May 2013

Weathering, Pastels and Round Piles...

All,

I have been using pastels for weathering for some time but only to add highlights to models.  I read with interest the posting by Ray Pilgrim on his Bylong Blog in January where he utilised another aspect of pastel use for weathering one of our Timber Ash Buffers.  As time goes on I am finding more uses and slowly getting use to the characteristics of pastels.

My normal timber weathering technique is to use Raven Oil mixed with methylated spirits to age the timber components ( normally before assembly ) as this gives a good base with which to continue the weathering process....I have covered this in an earlier post I am sure...Then take to the airbrush and dry weathering powders to complete the job.  The main concern with timber is the tendency for it to warp should you be over zealous with any form of liquid.  This is why i utlise metho if any moisture is required as it is very quick to dry and I cannot overemphasize the need to almost dry brush the timber and take one's time.

During the week I decided to utilise one of the "spare" completed bridge decks to explore the use of pastels further and experiment with differing application methods.  They certainly work very well in their dry state....but one idea I explored was to rub the chosen pastel stick on some medium wet and dry to give a coarse powder and then made a very week slurry with metho as the medium and applied with a very fine brush.  The effect is certainly different and the method's success can be gauged by the shots below...Some would suggest that the same could be achieved with weathering powders but the variation of shades available in pastels coupled with the cheapness of pastels vs powders makes it an easy choice.  While i am a relative novice with pastels...I can certainly see many advantages over weathering powders.

Also during the week ( and following a valid comment re our last post )  I decided to bite the bullet and perfect the manufacture and assembly of round piles for bridge bents.  It is certainly an issue that needed to be addressed not only for the bridge range but also for the upcoming Timber Opening range....I have included a shot of the first incarnation in a pre-weathered state.

Enjoy your weekend!!!


The bridge deck during the weathering process...


Weathering tools of trade...Raven Oil...available from saddlery shops for around $15.00 per bottle...The pastels were purchased via ebay for $12.00 per pack


The first round pile bridge assembly...

Wednesday 8 May 2013

Compound Girders...Take 2

All,

Following on from the last post regarding the double track span, Timber Road Overbridge.... It was back to the research books and also the drawing board this week.  My main concern with the first pilot model was that the bridge girders looked a bit lightweight when compared to the visually pleasing single track version.   When searching for photographic evidence of the girder arrangement it dawned upon me the complete lack of  historical shots of road overbridges in general...I guess the irony is that most photographers shoot from bridges and not at them...More is the pity!!!

I did though unearth an RTA report or study paper entitled Timber Beam Bridges....A Study of Relative Heritage Significance of RTA Controlled Timber Beam Road Bridges.  This 24 page offering is a very interesting read and a font of information on timber beam bridge design...One section also answered the question regarding girders etc

Basically it claims that the standards were....For bridge spans longer than 35 feet ( 11metres ) compound beams were used whereby two 12 inch x 12 inch timbers one above the other would be locked together by a combination of vertical bolts and wooden keys in precut slots across the interface.

By my reckoning...this rule was obviously fairly flexible as i have some records that show shorter spans were compound beams and indeed some longer spans than recommended were not compounded.  One would imagine that the road useage or traffic load would also play a part.  Another interesting fact was that in some bridges the outer girders were dressed or milled square beams but the inner girders were left in their natural state with bark attached in some instances....all for appearance sake.

Anyway i have concocted another pilot with compound girders "through the span" and have decided to have a bit of fun and dress it up a bit by way of painting and weathering.  The weathering is far from complete and the footings need to be converted to faux concrete...but i must admit that the compound girders are easier on my eyes when compared to the previous single girder examples.  Nevertheless it would appear that both designs were certainly seen in prototype service and i guess that legitimises the use of both in model form


Sunday 5 May 2013

Double Track Span Timber Road Bridges.

All,

Well we finally have the first "pilot" models of the next instalment in the bridge series....being the double track level approach variety.

Three completed examples were constructed during the week and me being a fussy type person... I have mixed feelings about the end result thus far.  It has to be said that while there are comparatively few detail photos available of the single line variety in existence....there is virtually none of the double track examples to gain info from especially period shots before modifications were made over the intervening years.  Sure there are at least two double track timber bridges within fairly close proximity from home....but it is hard to say to what extent these bridges have been repaired and or modified in the past.  Certainly the expected traffic loads that were factored into bridge design during the late 1800s /early 1900s would have shown inferiorities when compared to today and this coupled with rot, termite damage and shear wear and tear would have also played a part in changes and reinforcement design.

If anyone has double track span timber road bridge plans, photos or a lead to a photo location in the many prototype books available that i may have missed...I would appreciate your assistance.   

To my eyes the pilot examples look a touch underdone in the girder department between the two bents ( or span ).  I have a plan that show a single 12" x 12" girder with corbels...as per the pilot models in this post... but I have seen bridges constructed with an added 12" x 12" girder between spans....The bridge spanning Cooks Cutting just south of Yarra on the main south does have this feature.  I will build a couple more including this feature during the week and post the shots for comparison.  It may be that these differences will play a part in releasing multiple variations around a basic design.  I have also wondered whether these bridges lend themselves to being manufactured and released as one off built units? ...Time will tell....I can be assured that my circle of modelling aquaintances will let me know if this idea has merit.

One other hard to decide dimension is the overall length....This is an almost impossible task to get right as each layout and the owner's scenery wishes are different....another attraction to custom built and weathered bridges?

The important vital statistics of the "pilot" models are:

Overall length: 210mm,  Deck Width ( with Kerbing ): 70mm, Inside Pile to Pile ( Bent Clearance ): 115mm,  Deck Height clearance can be varied by utilising extra footing pieces which will be included with each bridge.  This clerance all depends on how the bridge is fitted to the layout.

As per normal the three existing pilots will end up on ebay as there are just too many bridges littering the workshop at present...