Friday 30 May 2014

Burke's Backyard and The Layout...

All,

I think it was Don Burke who originally advocated placing newly purchased pot plants around a garden to ensure correct placement before actually planting...  I guess we in this hobby have been following that adage for many years before he ever appeared as the "garden gnome" on TV.  In the case of model railroading it is not only trees and shrubs...but also track, structures, scenery and most other items that are positioned around a layout to ensure that "it all fits" from an aesthetic and operational point of view.

As touched on in an earlier post, I have been working on the location of the Argyle Flour Mill and just when I thought I had it all worked out...doubt has crept in regarding the ultimate positioning of this industry.  It is not so much the flour mill in isolation...but more about how the placement will affect the overall "look" of this location.  I have included some photos of the trial fitment of the mill and they should allow the reader to follow my logic.  I must firstly explain that the mill will either be just the solitary building or, as also shown, with a silo complex / grain unloading shed, most likely a boiler house and one or two small outbuildings. 

       
So here is the view including the solitary flour mill building...and to my eyes, even though the area has not been fully scenicked... the placement just looks too big and bold and tends to make the bridges appear to be out of scale or lacking in bulk or height. It could also be the fact that the mill is on a slightly elevated track and would have been better suited to have been in a hollow slightly hidden with landscaping or conversely the main lines may well have been better placed on a rising grade with the bridges approached via embankments...anyway, we are too far down the track for that modification to be retrofitted!  


Another shot showing the yet to be modified silo and grain unloading shed added The silo complex will need some work as it is presently depicting a structure for the cement industry and ultimately (if utilised here) will need the roof structures removed and a conveyer shed added and an auger chute to transfer grain to the mill.  Again the industry seems to overshadow the rest of the scene.   As I write, my wife has just poked her head over my shoulder to view the photographs and she also suggested that the scene looks "too congested" and maybe that is another aspect that comes into play.

I guess I will just have to play with other suitable industries over the weekend and maybe try a "lighter feel" like a petroleum depot and attempt to hide or tone down the industry with landscaping.  In the end it would be a shame to deviate from the original flour mill plan.  Ah well...tomorrow is another day!

On a more positive note, I received a fairly large and much anticipated, combined shipment from the US this morning from a number of suppliers.  With regards to one supplier called Scenic Express, I tend to place an order about twice a year with them and apart from a heft amount of static grass and other sundry items, I ordered some ready made weeping willows to place along the river bank.  I have planted a small amount already and feel that they have certainly improve the somewhat naked look that this area once had.  Based on my initial reaction and the reduced prices...I will be ordering a lot more differing types of trees made by this particular manufacturer to augment the home made varieties already growing on the layout....Don Burke would be proud! 


Tuesday 27 May 2014

Where Are We Headed?

All,

With the advancements in the level of detail of the ready to run market in both locomotives and rollingstock, one could certainly not be blamed for wondering just where we are going and where this development will all end up.  Surely, what I am about to post will polarize modellers and certainly alienate some...but since my earliest recollection of receiving my first Triang RTR model was sometime in 1964 and being continuously and actively involved in the hobby since that time...if nothing else I think I have earned an opinion at least.

I have just received a twin pack of ready to run LHG vans and upon opening the box and examining the contents...the first thing that struck me was the fidelity and the obvious detail that is what we have come to expect from today's models...what tainted that initial delight was the 11 items of detail that had somehow found their way to the bottom of the box and only became visible when the models were removed.  It must be stated at the outset that this phenomena was not limited to this particular purchase or manufacturer and is now sadly an all too common finding right across the spectrum...either upon arrival or shortly after the item has entered service.

How much detail is too much detail?.  I think this feeling is growing amongst fellow modellers and is certainly worthy of discussion.  Have we created this progression due to our own perpetual hunger and push for realism...or have the manufacturers "self adopted" the belief  that this is what we demand and anything less is to be seen as a self imposed failure on their part and a cause for possible belittling by other manufacturers?...in essence an ego thing...

A casual perusal of Australian model rail forum sites would certainly support the theory that our uncompromising level of detail demand and the merciless criticising of most item releases has had a large input.  As much as these forums are a cross section of people's opinions, have we lost the plot on detail expectation and price point v's practicality and quality....in other words do we want our cake and eat it as well?.  We could then equally focus the spotlight on the manufacturers and ask why it is that the level of the detail in general is now approaching museum quality but basic ( and long ago perfected ) items such as couplers and bogies have in some instances diminished in quality.

From my own perspective...it would be a lot easier if I was a "collector" and just made purchases that ended up in a glass fronted case to be just admired...but I do purchase rollingstock with the intention of weathering and then running on my layout...so some level of durability is important as is the need to be able to have a modicum of running quality with the ability for the item to reliably stay coupled to other rollingstock I have purchased.  Also to be regularly presented with a grab bag of detail items that have fallen off purchased items in transit or have been shed due to manufacturing deficiencies is certainly disappointing.  I guess that I first noticed this "detail race" with the arrival of the BWH wheat hoppers with the nifty but totally senseless spring loaded bottom discharge doors...was this an attempt at humour?...or was it an ego trip of "see what I can do"?...I readily confess that at the end of the day, they were a brilliant running wagon that had an adequate amount of detail and were relatively robust, tracked well and had reliable couplers...so I am a happy owner!

So what is the answer...

To be honest I have no one-statement panacea to this issue.  It may be that we have reached the technological limit of detail inclusion and the "detail race" may have reached it's limit.  It may be that any further detail items will be packaged separately and the onus is on the buyer to add these items should they wish.  Maybe we as modellers need to strike a balance between reliability, robustness and inclusions in our hobby demands and be more objective when we offer personal views and unsolicited reviews of products on forums?...Presently it just seems that some of these forum posts revert into a "pick the prototypical fault" competition which in turn then just slides into a "I know more than you do challenge" with little regard as to whether the item is a fair and reasonable facsimile that is value for money and will perform to a reasonable expectation. 

From the manufacturers perspective...I guess they have to be mindful of when an item has reached a balance between prototypical appearance and dimension, detail inclusion, manufacturing soundness, ongoing reliability and whether it is of merchantable quality...and to illustrate this point I add an analogy that while not totally comparing apples to apples...it does offer some similarities as to what an average consumer expects.

You arrive at the Holden dealer to pick up your new car...when you get in the driver's seat, you notice that all the control buttons and detail items have fallen off and are sitting in a neat pile on the passenger seat...the towbar has been fitted and will not reliably "couple up" with any commercially available trailer or caravan...and when you take it for a spin the wheels wobble...  I am not sure that you would be a happy person...and a comparison with any consumer product would illicit the same response...

In closing...I certainly am thankful of the almost limitless supply of Australian RTR items to choose from and the days of scratchbuilding and kit building of wagon rakes and locos is now but a memory ( apart from if one chooses ) ....but just hope that the above factors will balance out...and a happy and sensible medium can be reached.


I can't wait to unleash the air brush on these pair of LHGs...


Thursday 15 May 2014

Modelling Methods....

All,

I copped a bit of a hammering during the last week from a number of readers of this blog, via email and phone calls regarding bits that I have left out of the last few posts.  The main thrust of these conversations centred around the fact that the posts have not included any details of the products used and methods of painting and weathering of the models and this was of no help to a reader seeking tips or alternative ways of doing things.  I must admit that this aspect had not occurred to me...but was also patently aware that I get frustrated at times that some articles that I read and see do not include the all important nitty gritty of a project...usually for me this revolves around electrical type articles or blog posts.

To be honest I have never thought of my personal modelling as anything out of the ordinary....but I have to remember that there was a time when I could not glue two sides of a simple Walthers building kit together without one or more of my fingers becoming part of the structure and indeed I also remember a time when I figured that an air brush was something that only highly skilled artistic types had any right to utilise.  So for those that are interested...here are a couple of details that may or may not be of interest and who knows it may well generate a discussion which may provide me with alternatives and maybe inspire those new to the hobby to give scratchbuilding, kitbashing and painting / weathering a go.

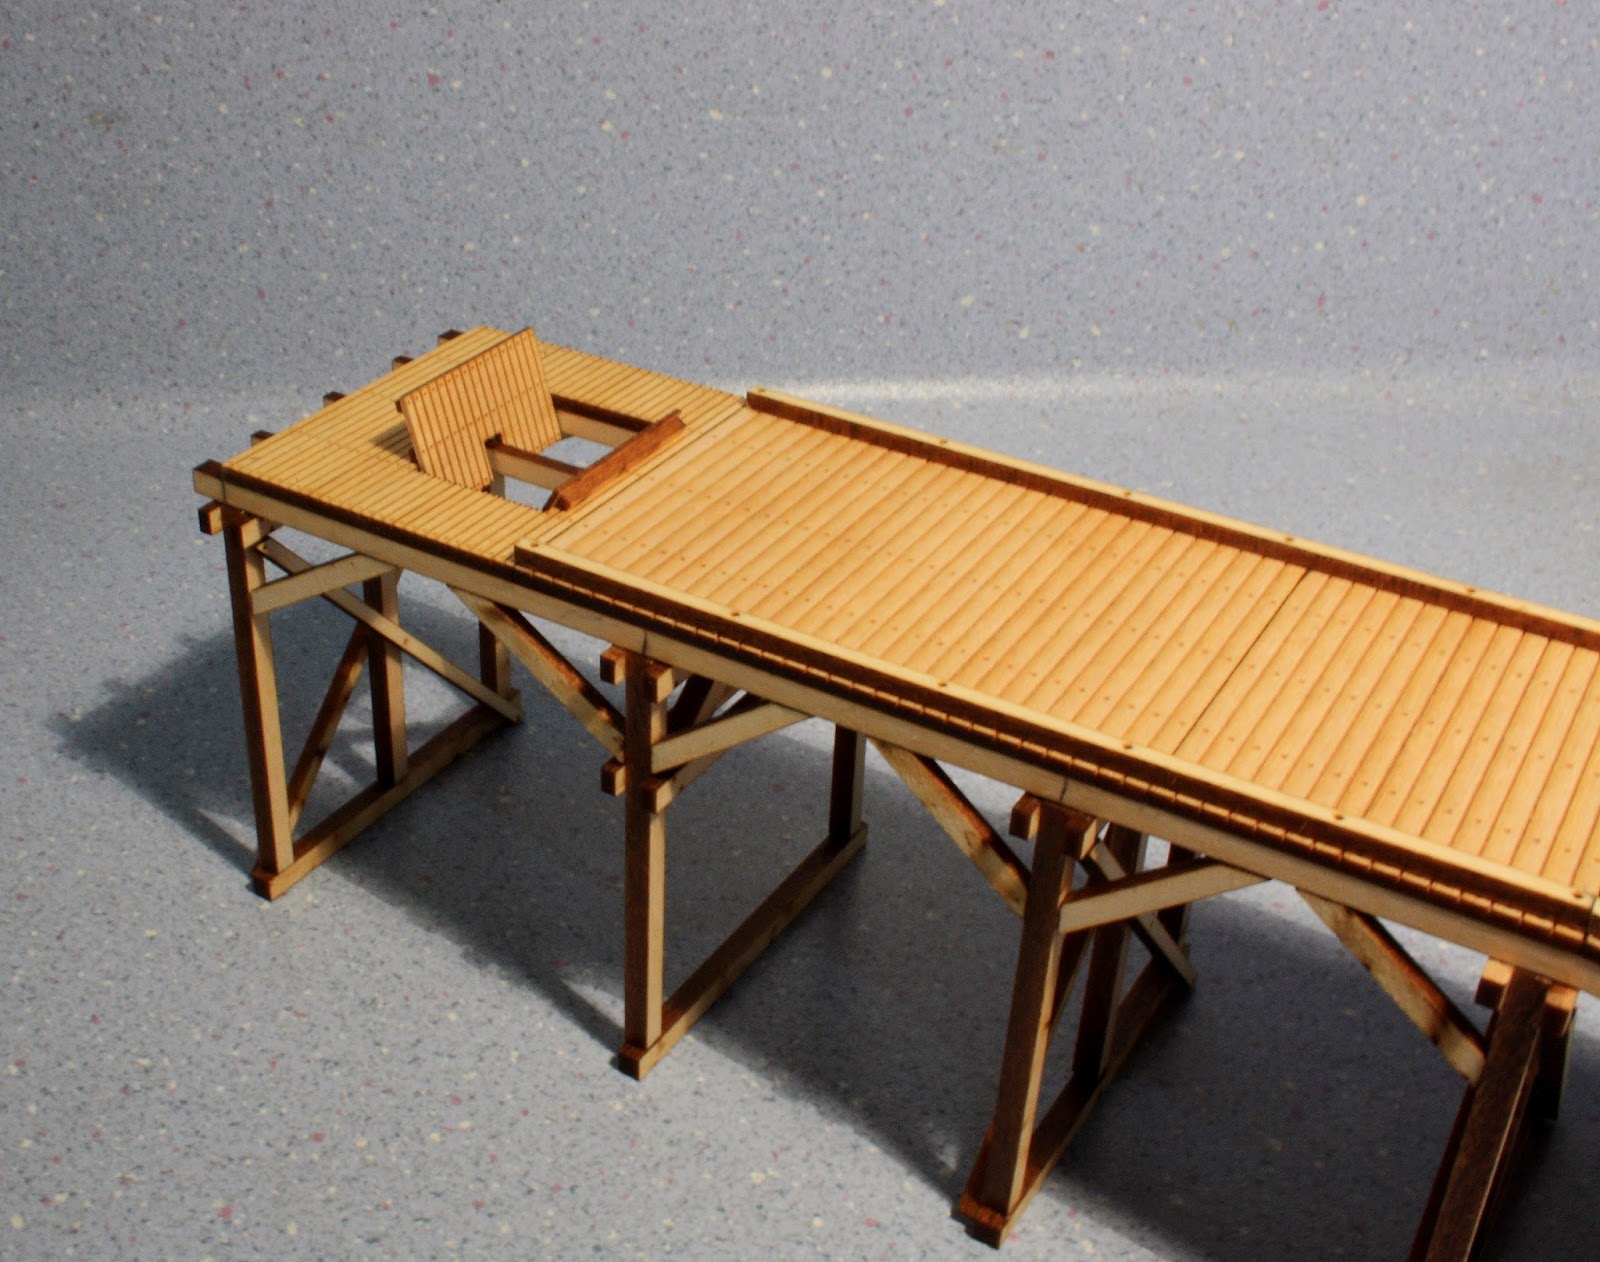
With regards to the Captain's flat ore loader...the main structure, ramp etc. is manufactured from Northeastern Lumber (Basswood) and as regular readers would be aware...we are fortunate to be able to laser engrave and cut this material to shape in-house...nevertheless it is a very easy timber to work by hand tools and also comes in a great range of sizes and thicknesses with clapboard and scribed siding also being available...their range is well worth a look for anyone scratch building and or kitbashing.


As I have posted before...there are a number of ways to weather Basswood and Balsa....but I do advocate a product called Raven Oil which is an Aussie made product normally associated with leather products.  It is essentially a dye and as much as it comes in a range of colours...I have only ever had need for "Raven Black".  A 50ml bottle retails for around $15.00, but I have seen it cheaper on Ebay...but it is classified as a class 3 flammable liquid, so I have no idea how it would go in the postal system.  I buy mine at a local saddle shop...much to the staff's entertainment.  To weather timber, Raven Oil needs to be heavily diluted down to a 1:200 (or more) mix with methylated spirits. (1 part Raven Oil to 200 parts Methylated Spirits) and this should be tested on scrap bits as additional coats can be applied later to taste.   The product should be used sparingly as "wetting" the timber too much during the weathering process can introduce warping, especially the thinner materials.  Some people prefer to use Isopropyl Alcohol ( IPA, Isocol, Rubbing Alcohol) as a substitute for Methylated Spirits...but I just find that the Metho dries much more quickly and that is certainly what you are after.  The Raven Oil mix can be overcoated for a darker effect or can be used to highlight sections of timber or where you have distressed the timber with a wire brush, craft knife or other... In recent times I have begun to use the mix via the airbrush and this method certainly has many advantages over the brush method.  One other word of warning...the mix will also soften PVA type glues and although the glue will reset when dry...just take it slowly while experimenting and don't rush or soak the timber and you will end up with a realistic look.

One bottle should last the average modeller a lifetime!

While on this subject...there is one other method of weathering and aging timber that is worthy of discussing and that is the steel wool and vinegar method.  Tease out a quantity ( say 1/2 of an average pad) of steel wool and place it in a glass container and pour in enough vinegar to just cover the steel wool.  Leave this for a few days and then on a scrap piece of timber...brush the liquid on sparingly. There will be no apparent change in the timber for some minutes...so don't be tempted to add more.  The timber will eventually transform to a beautiful aged and light colouring with a slight touch of silvering.  It is a great method...but for me, takes to long to dry. Still a worthwhile alternative to weathering timber and brilliant for timber sleepers...

The final treatment for timber following either of the above methods...is weathering powders to highlight bolts, rust runs from metal components and any other highlight features.  Even green powders can be used as some bridges that I have seen ( especially in semi shaded cuttings etc ) have pile and under deck components that have taken on a very light moss green colouring.

As an aside... the corrugated cladding for the loader is common or garden AMRI brand corrugated card.  There are more ways to simulate corrugated iron than time available here...but some are difficult to produce with tools etc and there are some ready made products that do not readily accept paint, stains, weathering etc. This area is purely an individual choice as to what product is used.  Certainly using the card product is a compromise...but treated thoughtfully it can be a success.  My only "bitch" with the brand I use is that the sheets are overly expensive to the point of being "in orbit" and the consistency and registration of the corrugations is woeful and sometimes a sheet needs to be butchered with a heck of a lot of wastage to gain "square" pieces for use. The issues with corrugated card have had me so frustrated that  I have had a tool under development with an engineering firm for some time and when I get time ( oh for an 8 day week) I will finalise it and this will allow full A4 sheets to be rolled in one go and I feel sure that we could put a dent in the current pricing and output quality...anyway that is for another day...

One last thing to cover in this overly long post ( sorry if you are asleep already) is paints for most structures... I am an unabashed fan of Tamiya acrylics and find that apart from say loco repaints, it can be used in almost any situation.  It sprays well, can be easily thinned with Isopropyl Alcohol, can be cleaned up with the same product and is not going to have any real harmful effects on your health due to prolonged exposure and comes in a fairly large range of colours that can be readily mixed to suit.  One last plus is that it is readily available from most toy, hobby and craft type shops...and of course with some other brands having issues with continuity and brand disappearance...I am happy to remain hassle free!

I have also adopted another paint/weathering brand...and that is the Lifecolor range from Italy and I find it a very useful addition to the "paint arsenal".  To date I have only purchased it in the 6 packs applicable to my needs...but feel that it has a real future in our hobby and being "classless" from a hazardous goods perspective it can be shipped without the hassles of other flammable brands which is another plus to not only the wallet...but your health as well.  I have in the past, purchased it from overseas directly in quantity...but am fairly confident that it can be now sourced locally...well
worth a look!


I hope that I have not bored the "masses" too much with this post and if it has inspired at least one modeller to try something new, then I am glad. It is after all about the exchange of ideas that makes our hobby a great one!  


Monday 12 May 2014

The Three Rs, Murphy and Ore...

All,

This post is quite timely as at present I am mid way through construction of the Captain's Flat ore loader which, as stated in a previous post was made redundant around 50 years ago and was demolished around 4 years ago.  I had spent a great deal of time researching this fairly obscure and unique structure when one considers the many mainstream pieces of rail related infrastructure around the state.  I have visited the actual site many times, scoured the internet, scanned most of my rail related historical books and also the (ever valuable) Bulletin CDs and have amassed a fair amount of material and photos to aid in my task.

It has always been my habit with anything I want to recreate in model form to stick to what I call the "Three Rs"...Research, Research, Research.  For me the enjoyment of all of this is that apart from my rail related interest, there is the added bonus ( for me anyway) and that being industrial history.  Of course it is a personal thing...but to me it is just as enjoyable to learn about the design, reasoning, location and use behind structures as it is to attempt to build the item of interest.  It may well be that having a bit of background knowledge may make the modelling task easier...it certainly does for me.  Indeed many model railway magazines and books have continually advocated to get out there and photograph what we see today as there is a fair chance it will not be there tomorrow...and as much as that seems quite sensible and fairly easy...it took me until a few years ago to heed the warnings and get of by rear end and do it!

Of course, like most things we do in this world...the little bloke called Murphy has a habit of creeping in and with the ore loader in mind...he certainly raised his head a little earlier tonight.  I had just updated the Laser Rail Bits Facebook page with progress on construction and a reply came from a regular contact with a photo attached of the ore loader while in use.  It is certainly one of the very few photos that I had seen of the loader being used to load rail wagons and indeed it also includes a partly obscured road vehicle dumping it's load...and absolute gold mine (so to speak) of detail. I was gobsmacked to learn that the website he referenced is one that I have visited a gazillion times for reference and I was ( still am ) at a loss as to how this photo could have eluded my prying eyes and mind for so long...Maybe I need to revisit the Three Rs and this time leave out the Murphy bit...

From a modelling perspective this photo has uncovered some previously unknown details and period changes that have taken place with the structure and it may be that it gives me cause to build another couple of versions which include these period details and ensuing changes. 

For now though...I am having an absolute ball and can see myself with a few incarnations of the loader adorning the workshop... Or maybe I need to stop this addiction now and focus my attention on the layout as a whole?  Yep like that is going to happen!!!


Sunday 11 May 2014

Captain's Flat... Part 2

All,

Just a short update on the ore loader project.  Spent most of the day celebrating Mother's Day and then spent a few hours this afternoon moving ahead and completing the unloading ramp shed frame.  I thought it timely to get a couple of shots now as when the corrugated sheeting is installed, the timber detail will disappear under a layer of simulated iron.

As simple a structure as this is...there have been many parts requiring rejigging prior to fitment.  A testimony to the builders of the prototype structure structure some 70 odd years ago and also a legacy of me not sticking rigidly to the scale drawings that I created over the last few weeks.

The next step will be daunting and this entails the initial weathering of the timber before sheeting occurs.  Some of the timber is very minute and any over exuberance with the weathering mix could create some distortion...so it will be steady as she goes.  I may utilise an airbrush in this instance to limit the wetting of the timber and give it many coats over a couple of days...

The weighman's hut will be also completed this week... but as it is positioned under the ramp, it is really a separate structure and can be treated accordingly and will only be permanently positioned once everything is setup on a diorama...

I hope the latest photos give a better perspective of the loader for those not familiar with the prototype...


Saturday 10 May 2014

Captain's Flat

All,

Can't imagine that anyone (even those with the remotest of interest in railways) would not be captivated by a trip to Captain's Flat.  Up until a few short years ago much of the railway infrastructure was still there, as if frozen in time.  With the mine closing in March 1962, the town almost evaporated in a relatively short time thereafter and with the last train to "The Flat" occurring in late August 1968 it is an absolute wonder that anything rail related still exists at all.  I guess it is a testament to the fortitude of the locals, interest groups and to a lesser degree the local government representative and administrators that much is still there for all to see.

Keeping the above introduction in mind, it was a sad indictment to the owning authorities that the ore loader was unceremoniously demolished in 2010 after having had many thousands of dollars spent on it's maintenance in the preceding year or two.  This loader was certainly a landmark and a cornerstone piece of the mine's history and understandably caused great angst amongst the locals and anyone else who has respect for our rail and industrial past.. as it seems the plan to demolish was kept under wraps until too late for any meaningful protests to be organised.

For many years I had planned to emulate this structure in model form, and now with it gone...I guess my task now is to pay homage to it's existence.  As much as I was fortunate enough to have visited the area countless times over the years and have a fairly extensive collection of facts, figures and photos...The task of measuring the vital statistics of the structure was never undertaken by me, and during research on the structure and uncovering countless photos by a plethora of people...I am yet to see a reliable set of drawings or accurate dimensions. (Although a reader here might steer me in a previously unknown direction)

Undaunted I set about recreating a set of drawings based on the scaling of photographs and deciphering a couple of rudimentary drawings that I had come across.  A start was made on construction this week, firstly on the loading ramp, frame and ore chute detail. Some licence has been taken with the ramp pile and bent height as I have no idea at this stage as to what terrain it will fit into on the layout...so these can be modified.

I am building three units concurrently...one unit to test components, one unit as per built (new condition) and the other unit as a weathered structure in it's later life.  I have had a ball to date and now with these components completed, construction will now commence on the loader shed and the weighman's office situated under and amongst the ramp frame.  I will of course blog the progress of this structure through to completion. The unit chosen for the layout will most likely progress to a diorama for placement.

For any reader who is curious to learn more about the area and it's rich history...there are many sites on the internet that are devoted to "The Flat" and of course an excellent article appeared in Byways Of Steam 29 written by Goulburn local, Leon Oberg.


Would love to credit this shot...but am not aware of the photographer...


Sunday 4 May 2014

Argyle Flour Mill

All,

Food and modelling are two words that are not normally associated with one another in this modern "thin" world...but when the weekend weather did everything but snow, these were certainly my main activities for the last two days,  interspersed with copious cups of tea...I was in nirvana.

With the tunnels and portals now approaching completion, it was time to focus activities in the other direction towards the Fish River station area.  The first industry that is visible on the approach to this location is the flour mill and so the logical choice for the next project within a project.  The exact location of the flour mill is directly beyond the bridge and on the "down" side of the main line, the mill being reached by a siding leaving the main line through trailing points ( facing down trains ) located just before the station platform.  This siding is long enough to also act as a down refuge for a short freight or also a stabling point for rail motors etc. that have terminated at Fish River.  The mill building and associated siding are also on a slightly elevated location with the siding climbing from the main to the mill which adds to the appearance.

The actual mill building started life as a Walthers kit, around 3 years ago, and has been in a stop start building and conversion process throughout that time.  I have over 100 photos of small to medium flour mills located all throughout NSW and had originally purchased two of these kits to bash into one large mill. In the end the decision was made to restrict the size of the mill and I ended up only using one of the original kits.  There is certainly much more to do before it will be finally finished.  I may fabricate and fit a louvered "ventilation chamber" to the roof as some mills displayed this design. Gutters and downpipes need to be fabricated and fitted as well there is also the need to populate the dock (which incidently wraps around three sides of the building) with pallets of bagged flour, a medium size workforce and the general day to day activities that go hand in hand with this type of industry.  Once fitted in situ I will then make the decision regarding other buildings such as the grain elevator building, boiler house and stack.

For now, I am just happy that the initial structure is progressing and think I am achieving the "flavour" I was after.


Thursday 1 May 2014

Grass Conversion...

All,

Just a very quick update on the last couple of posts...Many people contacted me to pass judgement on the selection of grass for the tunnel approach cuttings and portals.

Most who proffered that it was toooooo green are certainly correct and an hour or so this afternoon was taken to tone things down and try to bring it back to nature.  Some will note that the cutting sides have been toned down as well and this was certainly the plan all along.

My method of adjusting grass is to utilise a shaver ( multi blade is best ) and shave...or mow... the grass to the required uneven height and remove completely from some parts...again to avoid uniformity.  Then out comes the airbrushes and these tools can certainly change the look as well as covering up a multitude of sins.

So please take a look at the "after" shots and any comments good or bad will at least help me to decide on the methods going forward...