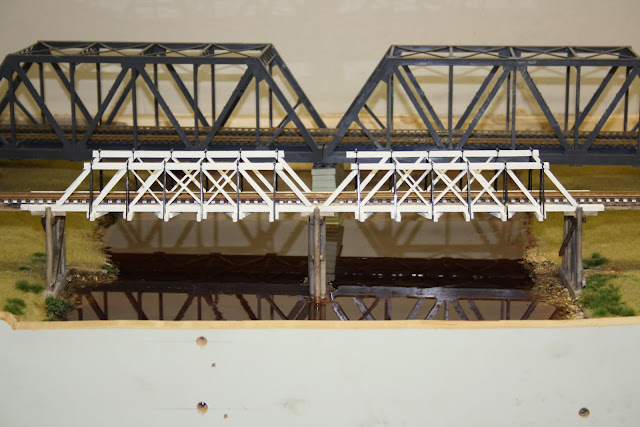
It is well over 7 years since i received my first shipment of basswood & ply veneer sheets & commenced dabbling in model railway detail items with the laser engraver.
While i am not a timber fancier as such, Basswood is a magic looking timber that is well suited as a modelling medium mostly due to the tight grain & inherent colouring. Incredibly it is classified in some quarters as a hardwood even though it is a very easy wood to machine & work. Not unlike balsa but a fair bit stronger & less inclined to "feather" at the edges.
With the aid of the laser & a fertile imagination it wasn't long before more than acceptable items were created & i figured that if it was made from prototype in timber....then it was possible to recreate in model form using scale timber.
Not everything in prototype stays new for ever & i feel that part of the attraction of timber is how it weathers & ages.
This is also so in modelling terms & i spent a deal of time trying products that would have the desired effect of prematurely aging these model creations, while not adversely affecting the timber.
I tried quite a few methods with mixed & at times frustrating results.
I have a long way to go before i feel i will have mastered this art...but a product i came across does go a long way to helping.
I am not sure where i first heard it mentioned but the product is generally used in the saddlery & leather industry as a leather stain....The brand i use is Raven Oil.
It is available in about 20 colours but indeed i have only used " Raven Black" & have had no real need to search out the other colours.
I found it by asking at a local saddlery....& will not forget the look i received when the salesperson asked me what i was going to use it for....
My ,method of applying is to mix the product with methylated spirits around 100 parts metho to 1 part Raven Black...although this ratio can be varied by the user.
Methylated spirits is a good thinning product & dries quickly which is handy when applying to components that have been glued & also minimises warping of the timber.
The mixed product is then brushed on & allowed to dry. Several coats can be used to build up age / colour... & brush direction can highlight grain etc.....Take it easy until you get a feel for it....It does indeed soak into the timber & while this can have adverse issues....it does ensure that the stain is permanent.
A couple of words of warning...Neatness counts as the weathering solution will not penetrate the timber where residue glue is located & do not flood the timber as some glues can be partially dissolved.
When dry...finishing off detail with weathering powders, dry brushing paint washes etc etc will really enhance the model.
Another product that i am trialling at the moment are the Floquil paint pens & am finding more & more uses for them.
While the described bridge is of a single line overpass....I am now working on a double line bridge based on the one located at Cooks Cutting south of Goulburn.
I have no idea at this stage just where these units will be installed on the layout....but as for most things....i will find a spot.
Anyway i have included some shots to illustrate the text....
 |
| The "virgin" bridge before treatment... |
 |
| The transformation begins... |
 |
| Still a lot to do....but another step closer |
 |
| Cooks Cutting....Located South Of Goulburn....Between Yarra & Breadalbane The next bridge project.... slightly different style from the single line project. |
 |
| The Floquil Range of Paint Markers |


