All,
Has been a while between posts and a few more decisions regarding the layout/hobby etc. have been made. In an earlier post I touched on some of the influencing factors regarding my involvement in the hobby and where I derive the greatest enjoyment. These factors coupled with work and family commitments has led me to the decision to moth ball the layout and liquidate a fair amount of locos, rollingstock, buildings, etc.
While I recognise that I am not alone in regards to all of the pressures that family, work and life in general puts upon us...I am just finding it difficult to achieve all of these things adequately and still feel comfortable in my own skin.
I have noticed for some time that my leaning towards "building" rather than "running" has been growing and my frustrations at not being able to adequately attend to these pursuits has been weighing heavily for far too long. Indeed I have a few "foreign orders" that have been sitting partially completed for some time and they need to be finalised as well and I thank these people for the patience shown...well I have not received any death threats so that is a plus!!!.
The lack of progress on the Laser Rail Bits range is also a determining factor in all of the decision making as the development of these items is certainly a happily self imposed commitment... and presently is not moving at the speed that I feel comfortable with. I am tired of the stop start approach as time permits and this also has to change.
The decision to liquidate the majority of layout stuff may seem drastic to some...but I suffer from the problem of too many distractions and if the distractions do not exist then...problem solved. I will be keeping a fair amount of items and equipment that will be utilised in building dioramas and mini dioramas and I look forward to being able to commence work on this aspect of the hobby as soon as things settle down. As for the layout room, well this room has been built with a fair amount of creature comforts and alternative uses in mind and if it never sees a completed layout it will never go to waste. I will complete the modelling room as I will still need an area away from "family life" and an area that will allow airbrushing and construction of some items.
The family has asked me about the future of the Blog and I do not see many changes occurring. The Blog was initially started to follow the trials and tribulations of a self confessed "dribbler" and his quest to build a layout. Along the way a smattering of Laser Rail Bits posts crept in and this has been valuable in discussing these items prior to manufacture and gauging reactions both good and bad from fellow modellers. It will continue in the same vein as a place to post my thoughts, ramblings and the latest topic that I am dabbling in and hopefully will continue as a place for exchange of ideas etc.
I have learnt a lot since embarking on what has become known as Fish River and even though the layout is far from complete, there are a multitude of skills that I have been able to hone and certainly some long held fears that have been overcome and if the future lends itself to a new beginning in the layout phase...the lessons will not have been wasted.
So where am I up to in the "Life Change" program....
The streamlining and transition of my main "real" business is nearly complete and we have now almost settled into a routine of an acceptable and predictable workload. From the Laser Rail Bits perspective...we are now working towards completion of re-stocking the entire range and making ready the "Wheel Painting Jig" and the "Trestle Range" for market. I will commence work on the "Camden Line Wayside Stations" project in the next few weeks and this may present an opportunity to build to order as well as offer kits. Of course a priority now exists to "decommission" the layout and make ready items that will be liquidated...a daunting prospect but necessary. Benches, track and electricals will stay for the moment...but most structures, stations, rollingstock and locos etc will find new homes...
Thanks to everyone for the last few years...the contacts and mateships established are all greatly appreciated and hopefully this aspect will not change.... Apart from the layout...nothing much will change...
Saturday 31 August 2013
Friday 9 August 2013
An Unannounced Announcement
All,
We have been working on a little project for some time that should make the drudgery of painting and weathering wheel sets a little bit easier.
A few years ago I got sick of wheelsets being blown all over the place, paint all over my fingers and then having to remove the paint from the treads of the freshly painted wheels so as to not transfer it to the track....so I made up a rudimentary painting jig that while acceptable was not entirely reliable. Late last year I decided to look at the concept again and during the design phase became aware of a unit being sold in the states. The unit in question holds 4 axles and while it basically solves the problem of painting I knew I could design a better "mousetrap" as I was the poor sod that needed to be satisfied with whatever I conjured up.
The design brief I had set myself was that the unit had to hold more than 4 axles, had to be heavy enough so it did not blow around or over while airbrushing and it had to offer the best access for the airbrush to get into all the "hard to get at" places easily...not just the wheel faces.
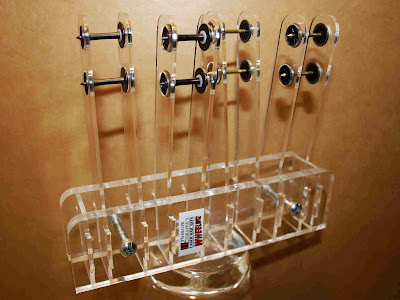
The design ended up being a unit that has the ability to hold 8 axles with a tread diameter of 10.5mm or 36" in 1:1 speak. We will offer an alternative unit that has 4 x 10.5mm and 4 x 9.5mm positions should the need arise. With the possibility of custom sizes should the unit prove popular. Each pair of retaining fingers are offset to each other which provides plenty of comfortable access to not only the wheel faces but all other surfaces that require painting. The fingers are manufactured from 2mm cast acrylic which while offering plenty of protection for the wheel treads does not leave the face partially obscured by the use of a thicker material. We have also avoided the use of any acrylic welding or glue joints and have designed the unit to be easily disassembled should alternative fingers need to be fitted down the track...or in the case of a component being accidently broken a replacement component can be sourced from us and repairs made rather than the unit being tossed away. There was also a plan to include a couple of stabiliser feet for the unit but after exhaustive testing and the use of 6mm acrylic for the base...I feel it is steady enough although we will keep some in stock should someone ask for these items.
The only minor drawback is there are some variable tolerances in wheel tread diameter and while we have settled on a nominal hole size...some brands of wheels certainly sit better than others in the unit due to these differences and tiny tapers on some examples. We have tested most of the local wheelsets and likewise for overseas examples and have not found any examples that will not fit in the unit...but some just sit better than others.
So we now have our first run completed and the units will be available from early next week and will be available on the Laser Rail Bits ebay shop....or from hobby shops should they prove their worth and we get approached...
As for price...while this has not been entirely decided upon...we would anticipate a price around $23.00... in reality we are awaiting an answer from our supplier of acrylic who has signalled a hefty price rise on the back of the falling Aussie dollar and when we are made aware of the magnitude of this increase we can then set a price that should remain static for some time.
It is amazing that we get bombarded by suppliers when the Aussie dollar falls but never hear from them when it goes up...
BTW we have named the jig...the WheelWiz which was decided by my daughter Sophie when she was asked what she thought while watching us testing the unit earlier last week...
At the end of the day it is Aussie designed and Manufactured....and that is the important part for me.
I have included some pics and of course welcome any feedback...

We have been working on a little project for some time that should make the drudgery of painting and weathering wheel sets a little bit easier.
A few years ago I got sick of wheelsets being blown all over the place, paint all over my fingers and then having to remove the paint from the treads of the freshly painted wheels so as to not transfer it to the track....so I made up a rudimentary painting jig that while acceptable was not entirely reliable. Late last year I decided to look at the concept again and during the design phase became aware of a unit being sold in the states. The unit in question holds 4 axles and while it basically solves the problem of painting I knew I could design a better "mousetrap" as I was the poor sod that needed to be satisfied with whatever I conjured up.
The design brief I had set myself was that the unit had to hold more than 4 axles, had to be heavy enough so it did not blow around or over while airbrushing and it had to offer the best access for the airbrush to get into all the "hard to get at" places easily...not just the wheel faces.
The design ended up being a unit that has the ability to hold 8 axles with a tread diameter of 10.5mm or 36" in 1:1 speak. We will offer an alternative unit that has 4 x 10.5mm and 4 x 9.5mm positions should the need arise. With the possibility of custom sizes should the unit prove popular. Each pair of retaining fingers are offset to each other which provides plenty of comfortable access to not only the wheel faces but all other surfaces that require painting. The fingers are manufactured from 2mm cast acrylic which while offering plenty of protection for the wheel treads does not leave the face partially obscured by the use of a thicker material. We have also avoided the use of any acrylic welding or glue joints and have designed the unit to be easily disassembled should alternative fingers need to be fitted down the track...or in the case of a component being accidently broken a replacement component can be sourced from us and repairs made rather than the unit being tossed away. There was also a plan to include a couple of stabiliser feet for the unit but after exhaustive testing and the use of 6mm acrylic for the base...I feel it is steady enough although we will keep some in stock should someone ask for these items.
The only minor drawback is there are some variable tolerances in wheel tread diameter and while we have settled on a nominal hole size...some brands of wheels certainly sit better than others in the unit due to these differences and tiny tapers on some examples. We have tested most of the local wheelsets and likewise for overseas examples and have not found any examples that will not fit in the unit...but some just sit better than others.
So we now have our first run completed and the units will be available from early next week and will be available on the Laser Rail Bits ebay shop....or from hobby shops should they prove their worth and we get approached...
As for price...while this has not been entirely decided upon...we would anticipate a price around $23.00... in reality we are awaiting an answer from our supplier of acrylic who has signalled a hefty price rise on the back of the falling Aussie dollar and when we are made aware of the magnitude of this increase we can then set a price that should remain static for some time.
It is amazing that we get bombarded by suppliers when the Aussie dollar falls but never hear from them when it goes up...
BTW we have named the jig...the WheelWiz which was decided by my daughter Sophie when she was asked what she thought while watching us testing the unit earlier last week...
At the end of the day it is Aussie designed and Manufactured....and that is the important part for me.
I have included some pics and of course welcome any feedback...


Saturday 3 August 2013
Trestles and Termites...
All,
As I commenced writing this post I became aware that this is Post No. 100. When I informed Vanessa of this fact her reply was "Amazing how one person can dream up and write that amount of drivel...Congratulations anyway".....Sophie was less celebratory as her reply was "Whoop De Do Basil"....in reference to her love of the Austin Powers movies...all tongue in cheek I hope.
Firstly I would like to address a comment made in reply to the last post regarding trestles and in particular the wing assemblies and the possibility that we may have erred in relation to the angle of the wing wall sheeting timbers. I thank Graeme for posing the question as I must admit that the wings ( as simple as they are in design ) had me baffled for some time as each consecutive trial assembly just did not look right. Apart from the wing wall pile diameter I thought the last attempt was almost there....but the comment did have me rushing for our research material file to check the facts. Even though we have departmental plans and some early photographic evidence that the timbers on some structures were indeed angled... after lengthy pondering I feel Graeme's comments are valid and the vast majority of trestles ( that had wing walls incorporated ) do show the timbers to be level....so we will work toward this modification and will post the results when complete. While on the issue of comments...I take the opportunity to thank those who contribute as this exchange of info is important to the decision making progress of both the kits and my modelling experience as a whole.


The remainder of the week has been taken up by normal work, kit stock replenishment and a little job that I have been meaning to get to for some time. Apart from the main layout room I do not have a dedicated modelling room and remnants of my hobby participation are pretty much scattered all over the house, business and layout room. I have for some time had a corner of the layout shed earmarked for conversion to address this issue and as the doctor said "take it easy for a couple of weeks" ...I felt now was the time.
As an aside we removed two large gum trees that were located about 10 metres from the layout shed about 4 months ago due to the trees exhibiting some major cracks at the bases and a general appearance of not being well. The resultant findings were that one of the trees was sponsoring a large termite nest in the lower trunk and indeed it was time for these two gums and infestation to go. This revelation left me with a giant hole in the pit of my stomach as the proximity of these trees to the timber "mother load" that is the train room was too close for comfort. In hindsight it was a dumb decision to partially line the existing portion of the shed with normal framing timber and this new addition of a hobby room would be lined with termite treated timber and extra vigilance would be exercised both now and in the future for the shed as a whole.
But I digress....the proposed modelling room will be a 3 metre x 3 metre area with benches on 3 walls with the main criteria(s) being a permanent location for the air brush cabinet with the exhaust plumbed to the outside and a spot for an old rotary engraving machine that is now utilised as a hobby milling machine. There are two good size windows in this room for natural light plus good views of passing trains on the main south and I have run enough power to the room for most future needs and a reliable security system with remote cameras. The rest of the room will be used for general kit building and hobby storage. I will also take advantage of the room's proximity to the layout room and will run a "repair road" through the wall so that troublesome trucks can be easily despatched from the layout to the workshop for repairs etc...
I have included a shot of progress...The layout room is adjacent to the wall at right of shot...

Subscribe to:
Posts (Atom)